Commissioning
General
Once correctly connected, the FLS-M can be taught and controlled as a luminaire on Matter-certified controllers and gateways of various home automation systems.
Here is a step-by-step guide on how to connect the LED strips.
- RGB LED strips (red, green, blue)
- RGBW LED strips (red, green, blue, white)
- RGB+CCT LED strip (red, green, blue, warm white, cold white)
- CCT LED strip (warm white, cold white)
- Single-color LED strip
- Individually addressable LED strips (WS2811, WS2812, WS2812B, WS2813, WS2814, WS2815, TM1814, SK6812)
Matter Controller
The FLS-M works with all approved Matter controllers that are located in the same WiFi.
Matter Controller from Apple
Matter Controller from Google
- Compatible Matter Controller by Google
- Set up and manage Matter-compatible devices in the Google Home app
Matter Controller from Amazon
Matter Controller from Home Assistant
Matter Controller from Aqara
The Multi-Admin function allows the FLS-M to be taught and operated simultaneously on several Matter controllers from different manufacturers in the same WiFi.
Commissioning
Zigbee Gateway
The FLS-M can also be used as a fully functional Zigbee LED controller. A Zigbee gateway is required to teach in and operate the LED controller.
- A gateway by Phoscon like the ConBee III, ConBee II and RaspBee II is recommended
- Also supported are the Philips Hue Bridge and Hue Bridge Pro, Ikea Tradfri and Dirigera Gateway, Home Assistant ZHA, Zigbee2MQTT, and many more.
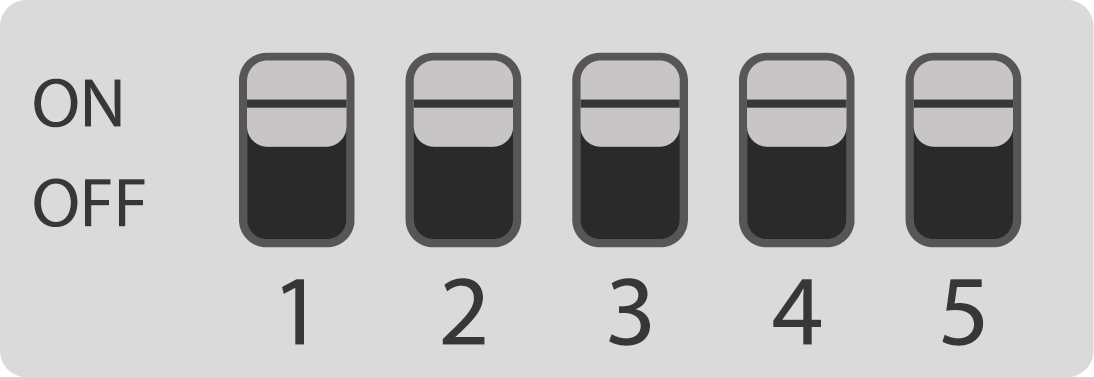
DIP switch No. 1 setting = ON: selecting the
operation of the FLS-M via Zigbee
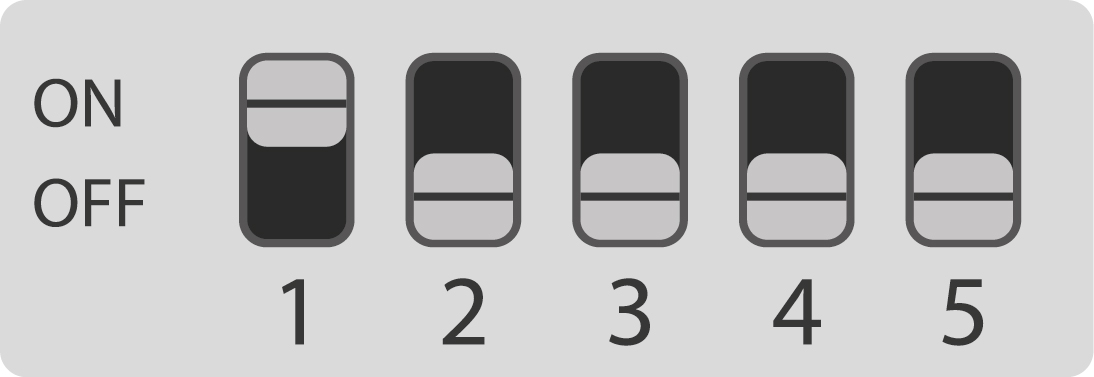
All configurations of the LED strips apply to operation with both Matter and Zigbee. The radio protocol is selected via the DIP switch position:
Connection terminal
How do I connect the cables correctly to the spring-cage terminal?
Solid conductors can simply be pushed into the black cable opening with a little force
for fine-stranded conductors (untinned, no wire ferrule), the white spring contact must be pressed at the same time, e.g. with a narrow screwdriver
to release the conductor, also press the white spring contact (1) and pull out the conductor (2)
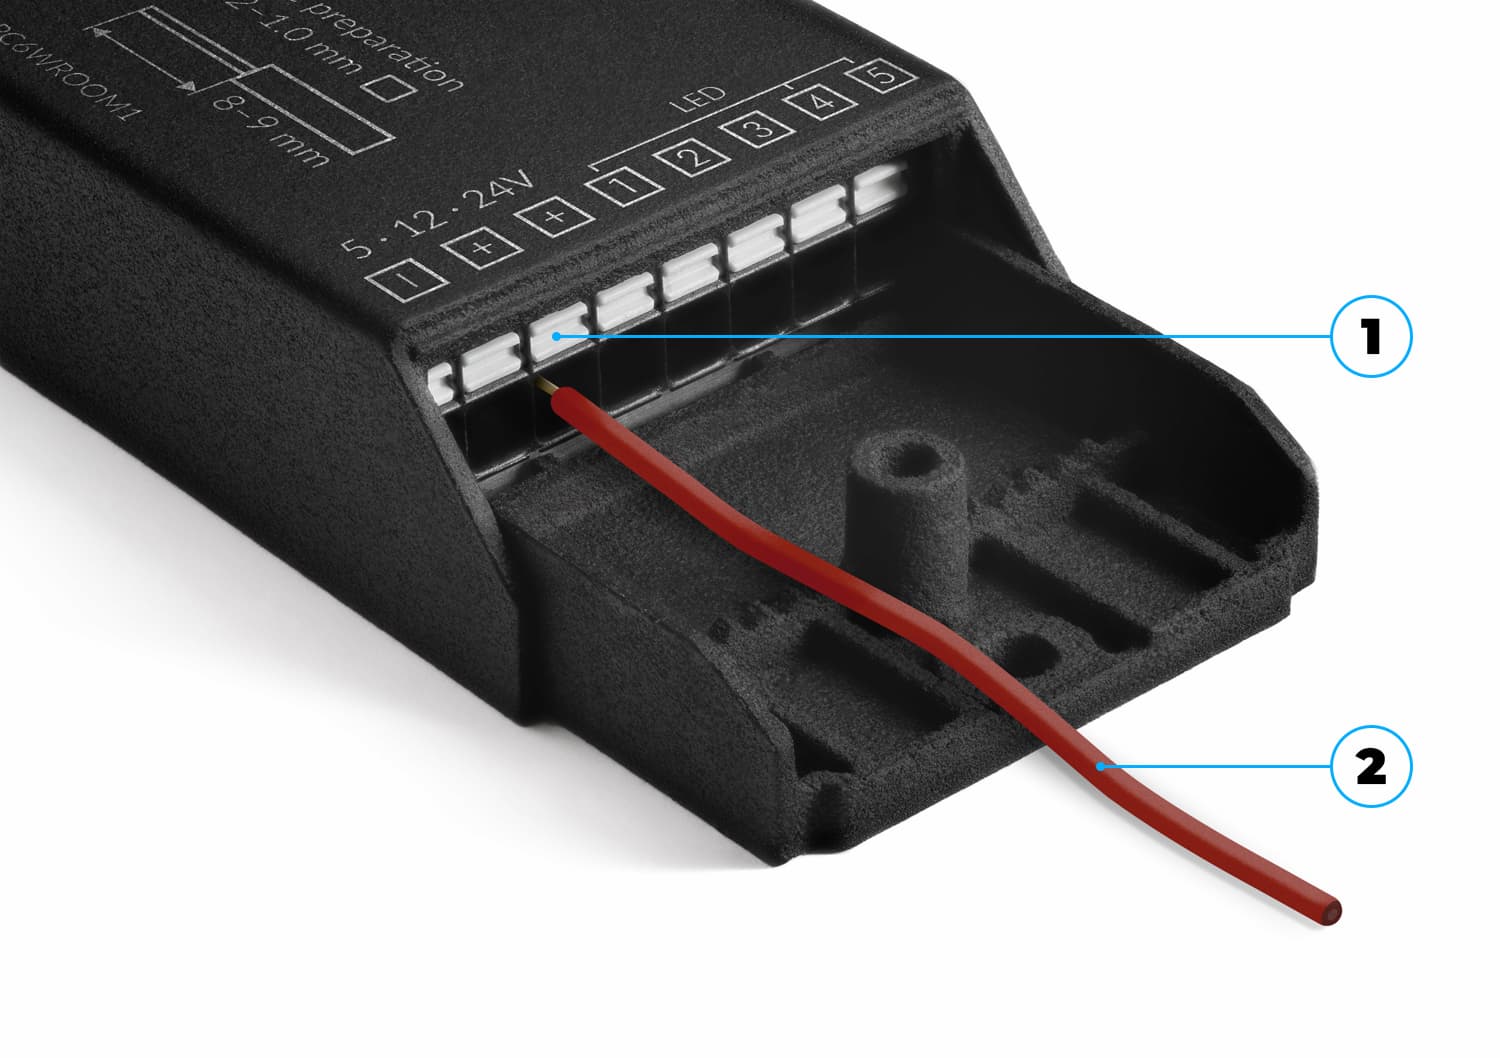
Terminal block
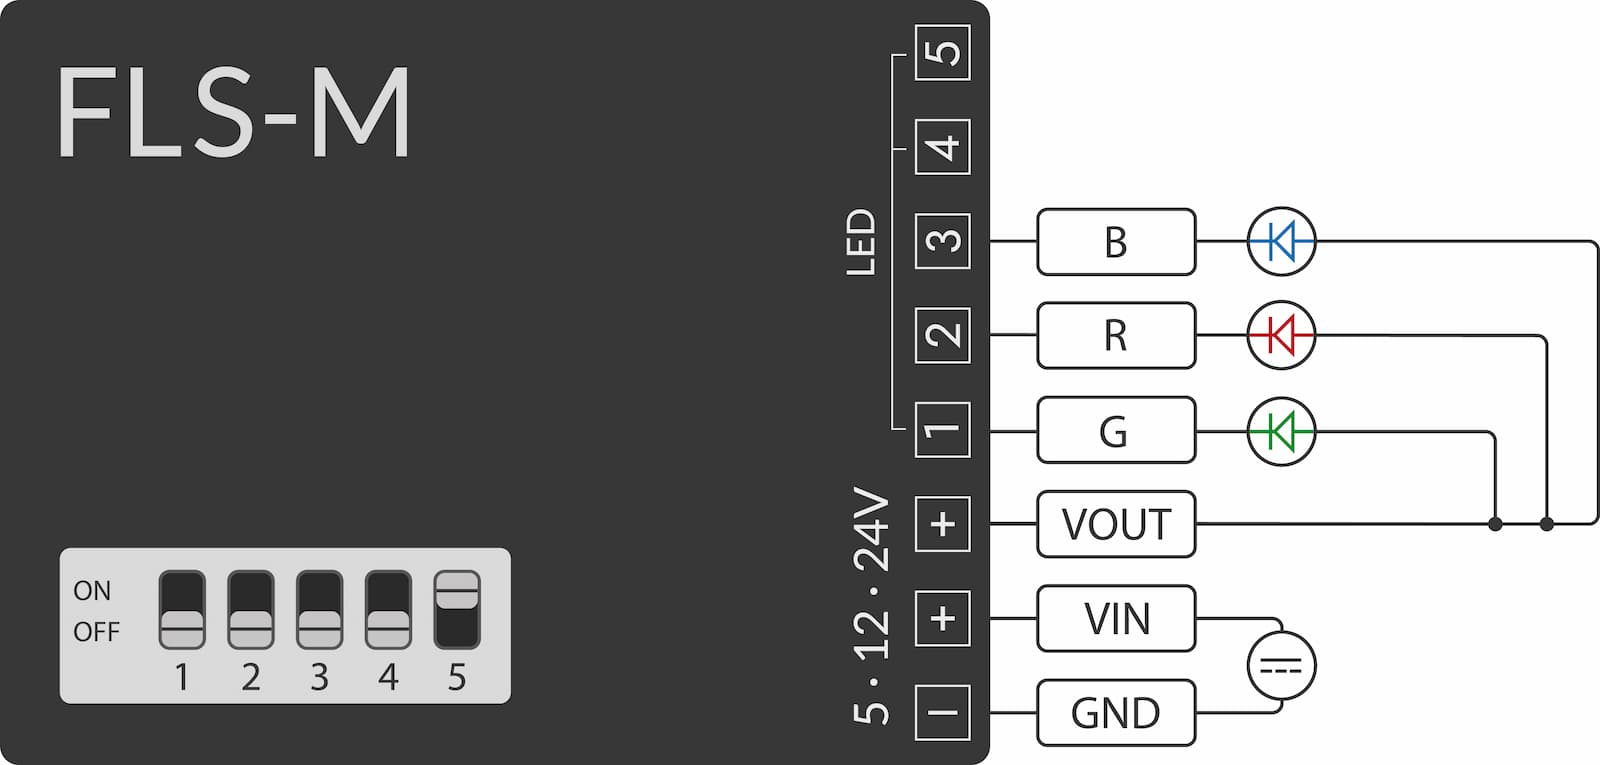
Connecting RGB LED strips
the cables for connection must meet the following technical conditions and be connected according to this description
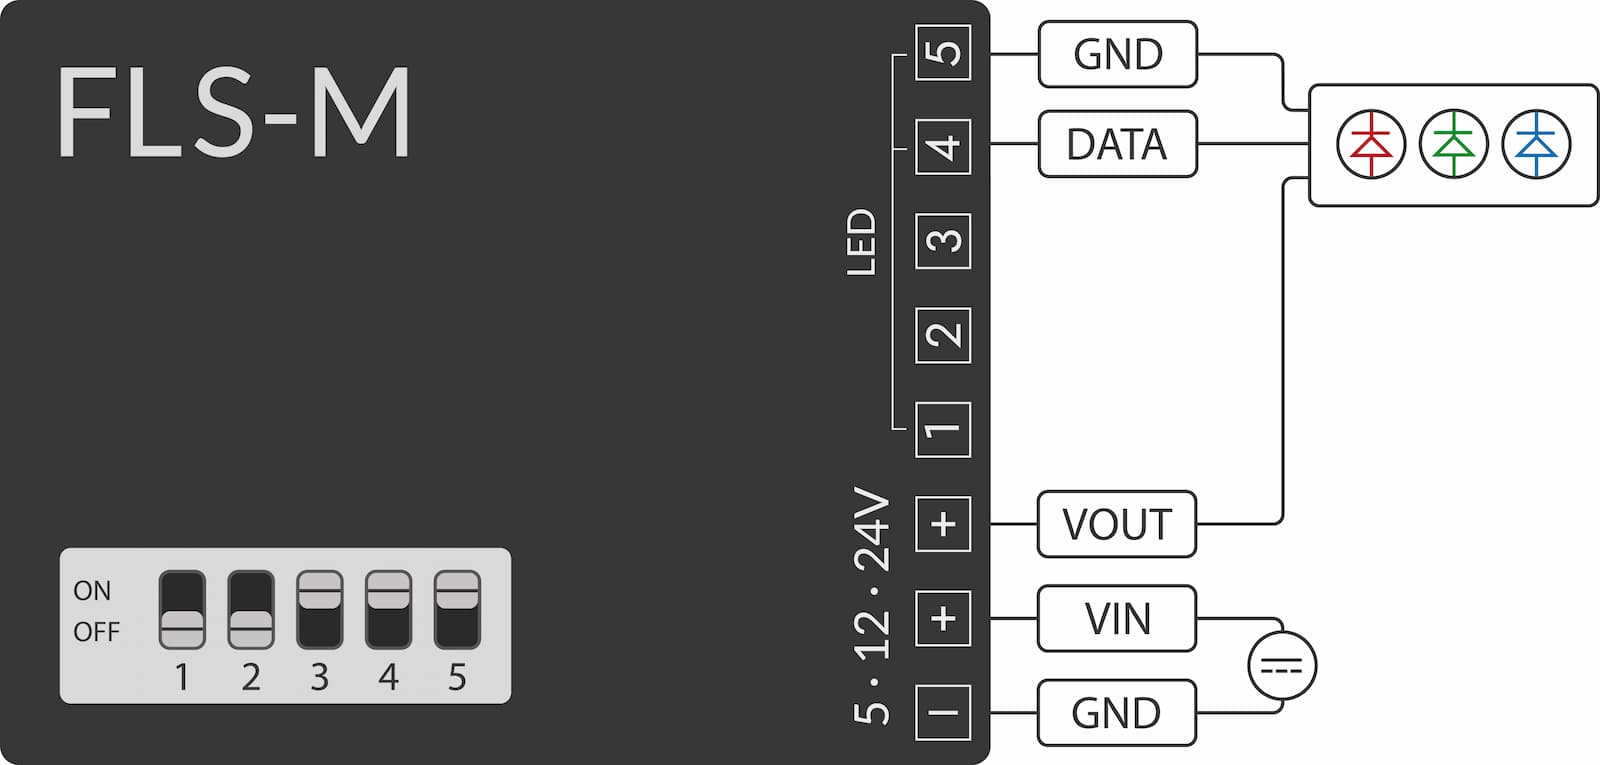
the color channels of the LED strip must be connected to the correct channel of the FLS-M. The following circuit diagram shows the connection assignment. The following applies: GND = power supply unit ground, VIN = power supply unit operating voltage, VOUT = LED strip operating voltage
the connected type of RGB LED strip must be communicated to the FLS-M by setting the DIP switch. The DIP switch is accessible on the top of the housing. A small screwdriver can be used to set the switch
the FLS-M registers in the Matter Controller as one luminaire
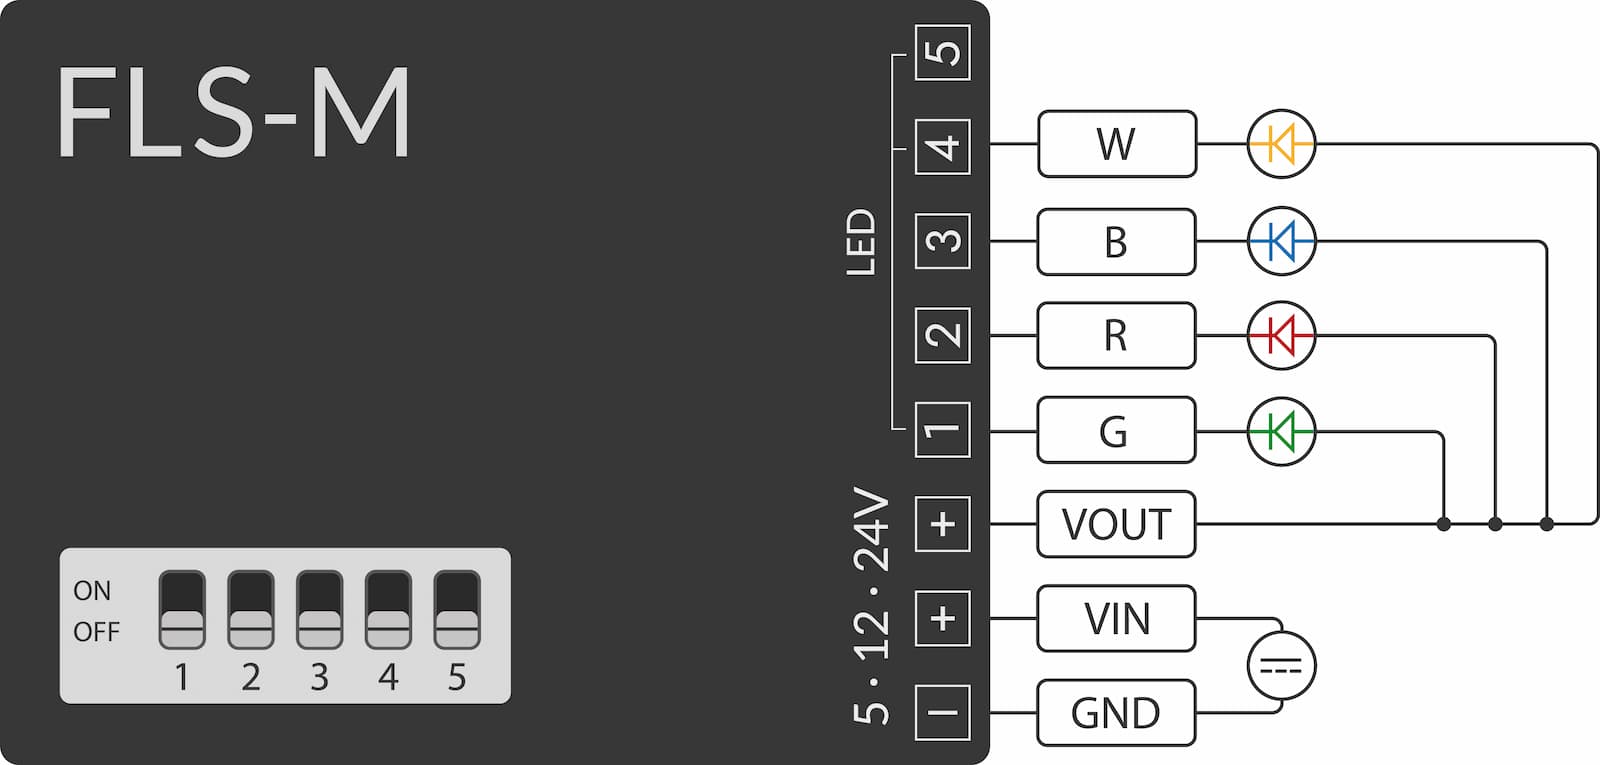
Connecting RGBW LED strips
the cables for connection must meet the following technical conditions and be connected according to this description
the color channels of the LED strip must be connected to the correct channel of the FLS-M. The following circuit diagram shows the connection assignment. The following applies: GND = power supply unit ground, VIN = power supply unit operating voltage, VOUT = LED strip operating voltage
the connected type of RGBW LED strip must be communicated to the FLS-M by setting the DIP switch. The DIP switch is accessible on the top of the housing. A small screwdriver can be used to set the switch
the FLS-M registers in the Matter App as one luminaire
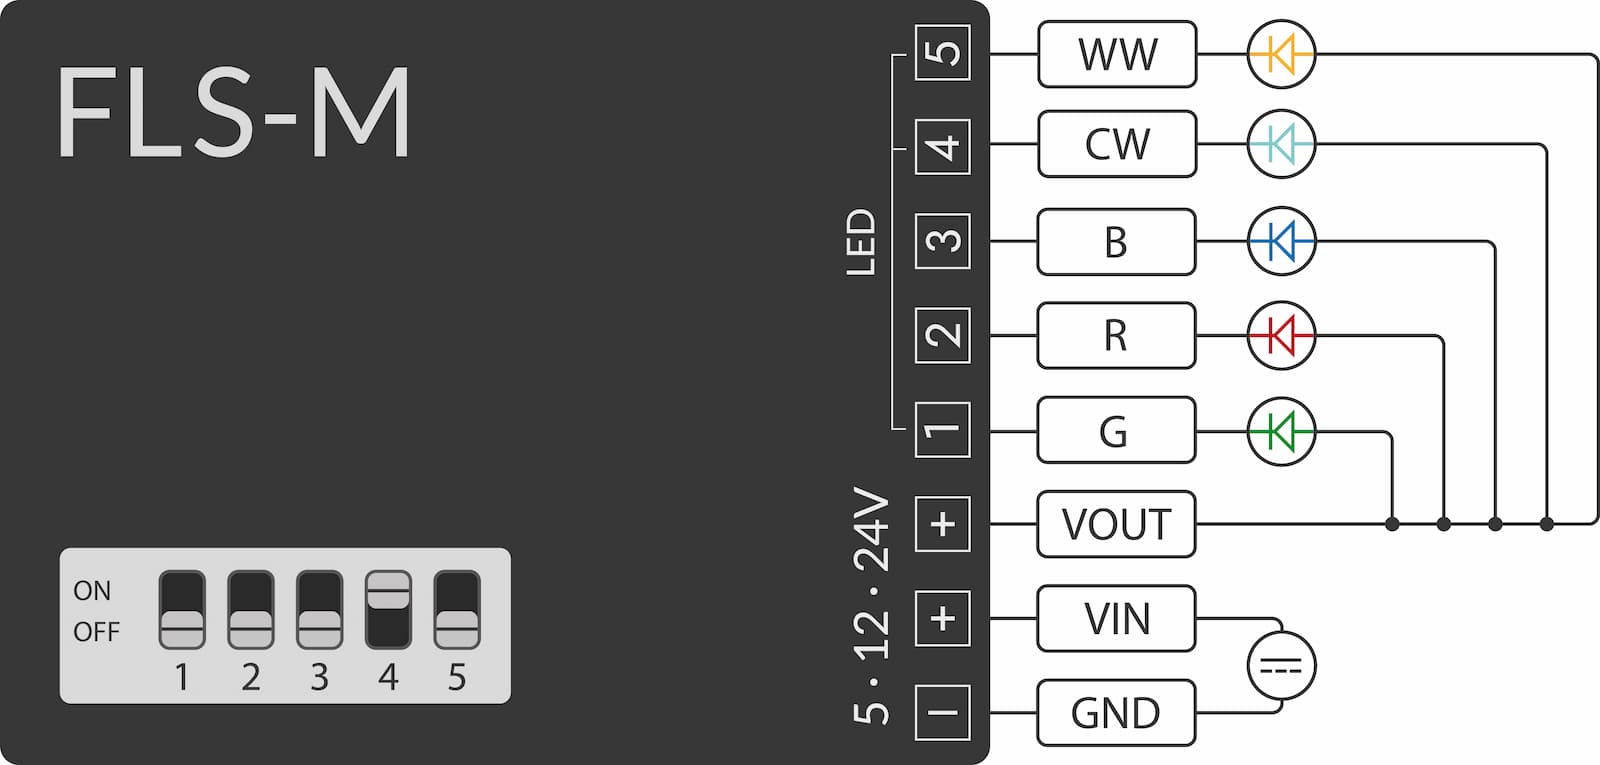
Connecting RGB+CCT LED strips
Uniform control
the cables for connection must meet the following technical conditions and be connected in accordance with this description
the color channels of the LED strip must be connected to the correct channel of the FLS-M. The following circuit diagram shows the connection assignment. The following applies: GND = power supply unit ground, VIN = power supply unit operating voltage, VOUT = LED strip operating voltage
the FLS-M must be informed of the connected type of RGB+CCT LED strip by setting the DIP switch. The DIP switch is accessible on the top of the housing. A small screwdriver can be used to set the switch
the FLS-M registers in the Matter App as one luminaire
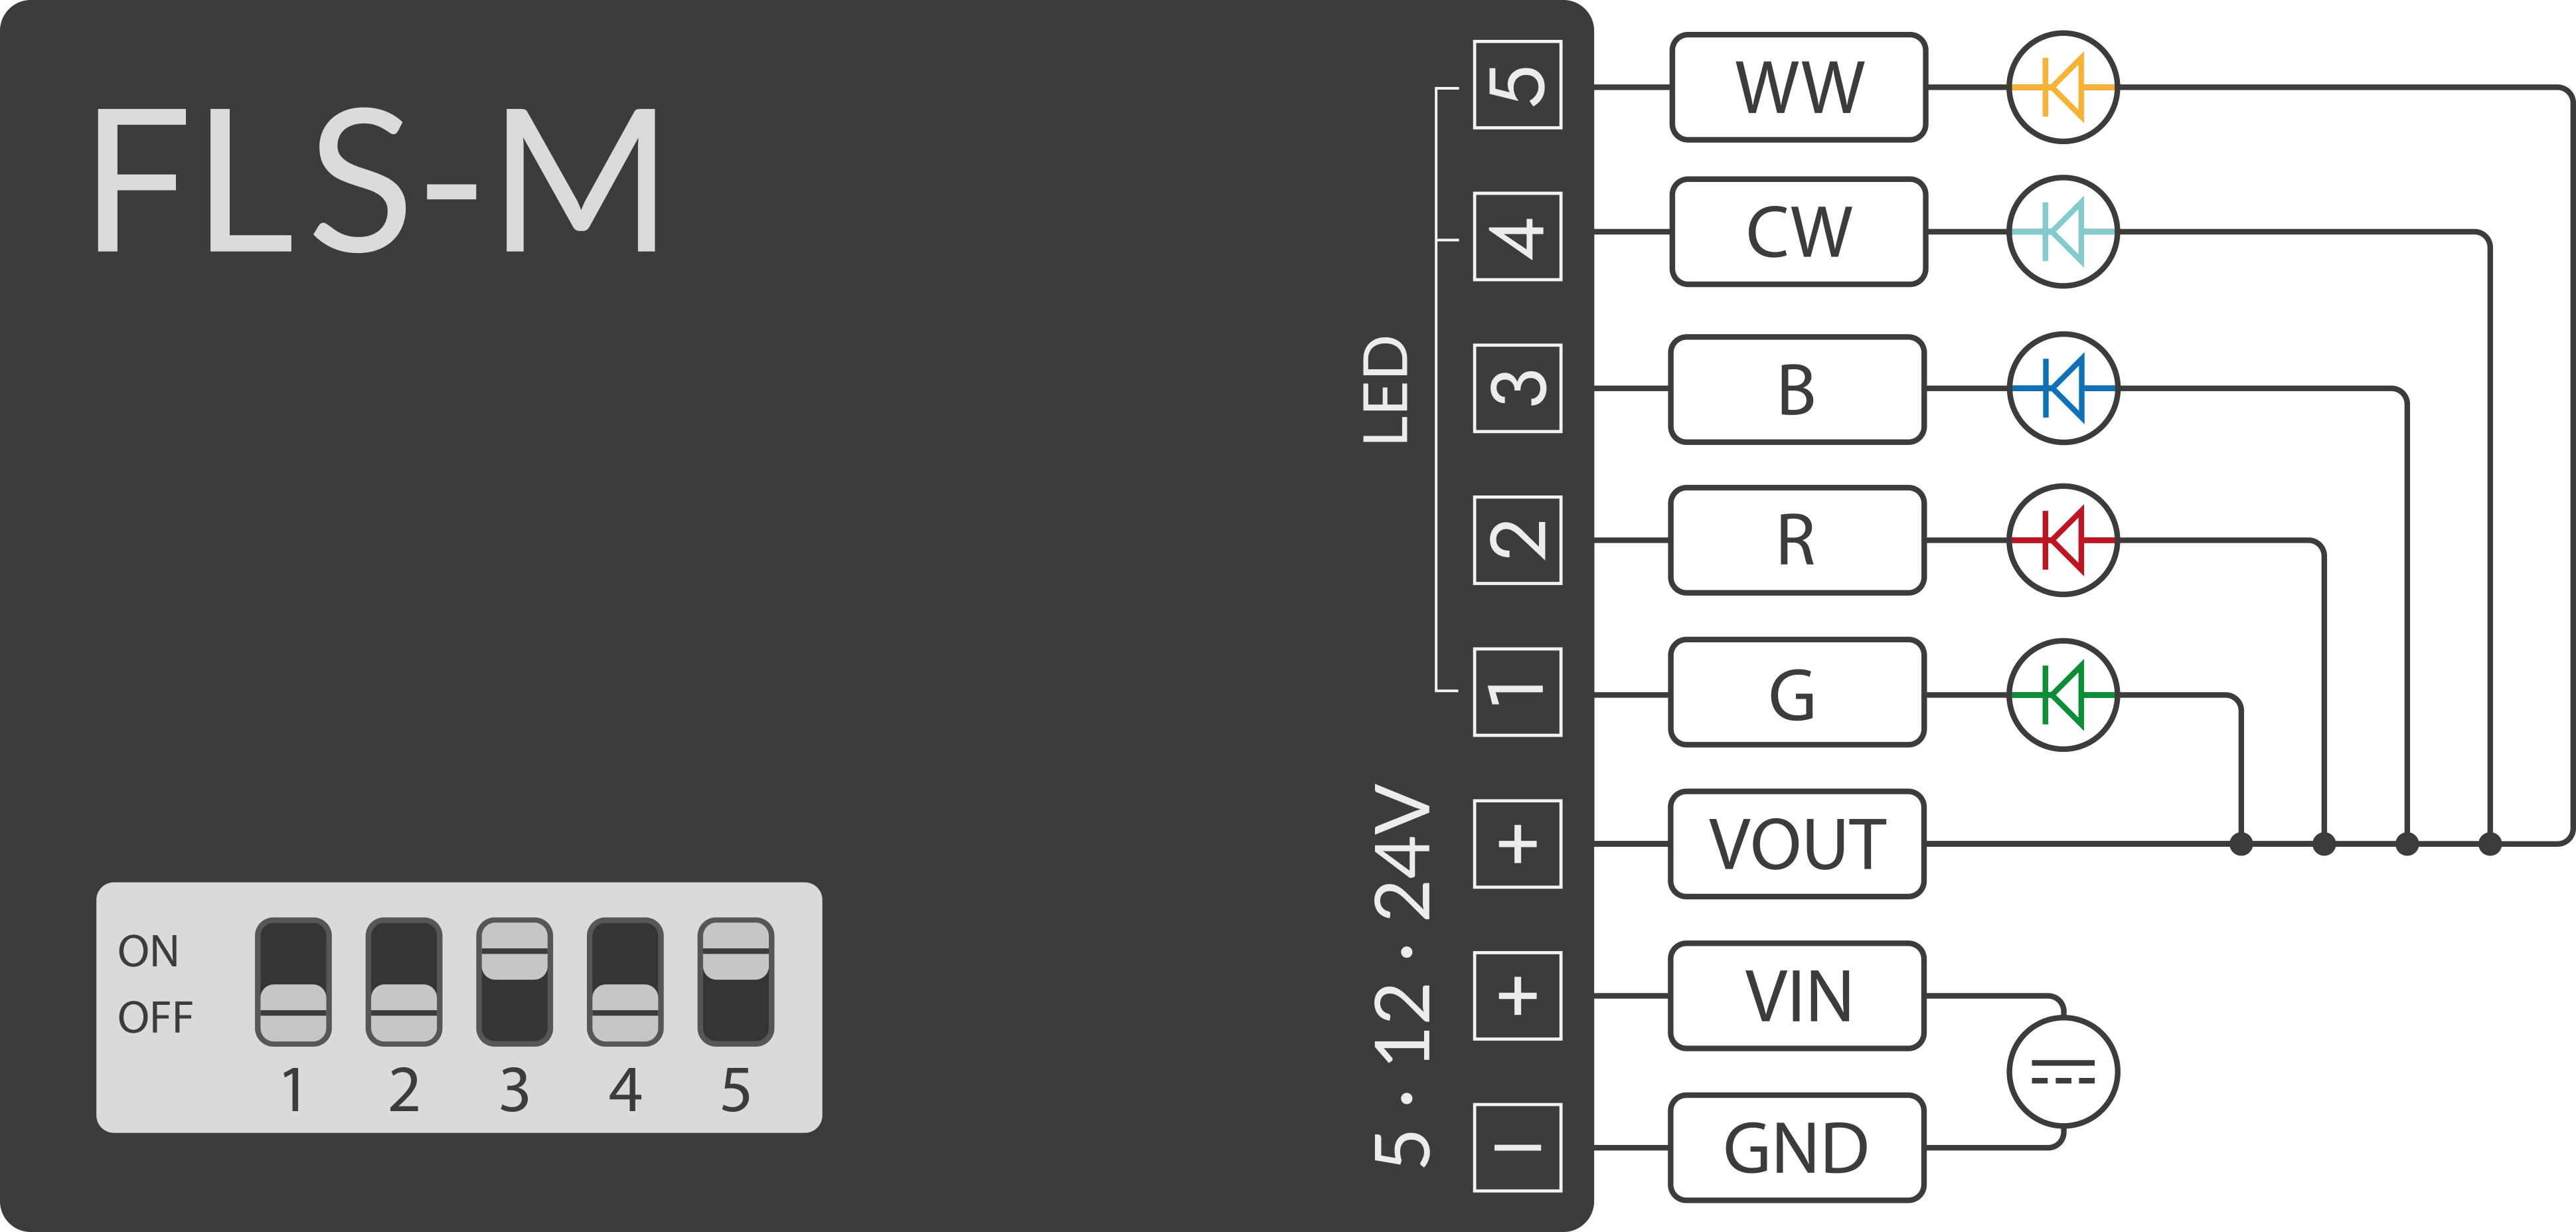
Separated white channel
the cables for connection must meet the following technical conditions and be connected in accordance with this description
the color channels of the LED strip must be connected to the correct channel of the FLS-M. The following circuit diagram shows the connection assignment. The following applies: GND = power supply unit ground, VIN = power supply unit operating voltage, VOUT = LED strip operating voltage
the FLS-M must be informed of the connected type of RGB+CCT LED strip by setting the DIP switch. The DIP switch is accessible on the top of the housing. A small screwdriver can be used to set the switch
the FLS-M registers in the Matter App with two luminaire
the white channel can be controlled independently of the RGB channel
Connecting CCT LED strips
the cables for connection must meet the following technical conditions and be connected according to this description
the white channels of the LED strip must be connected to the correct channel of the FLS-M. The following circuit diagram shows the connection assignment. The following applies: GND = power supply unit ground, VIN = power supply unit operating voltage, VOUT = LED strip operating voltage
the connected type of CCT LED strip must be communicated to the FLS-M by setting the DIP switch. The DIP switch is accessible on the top of the housing. A small screwdriver can be used to set the switch
the FLS-M registers in the Matter App as one luminaire

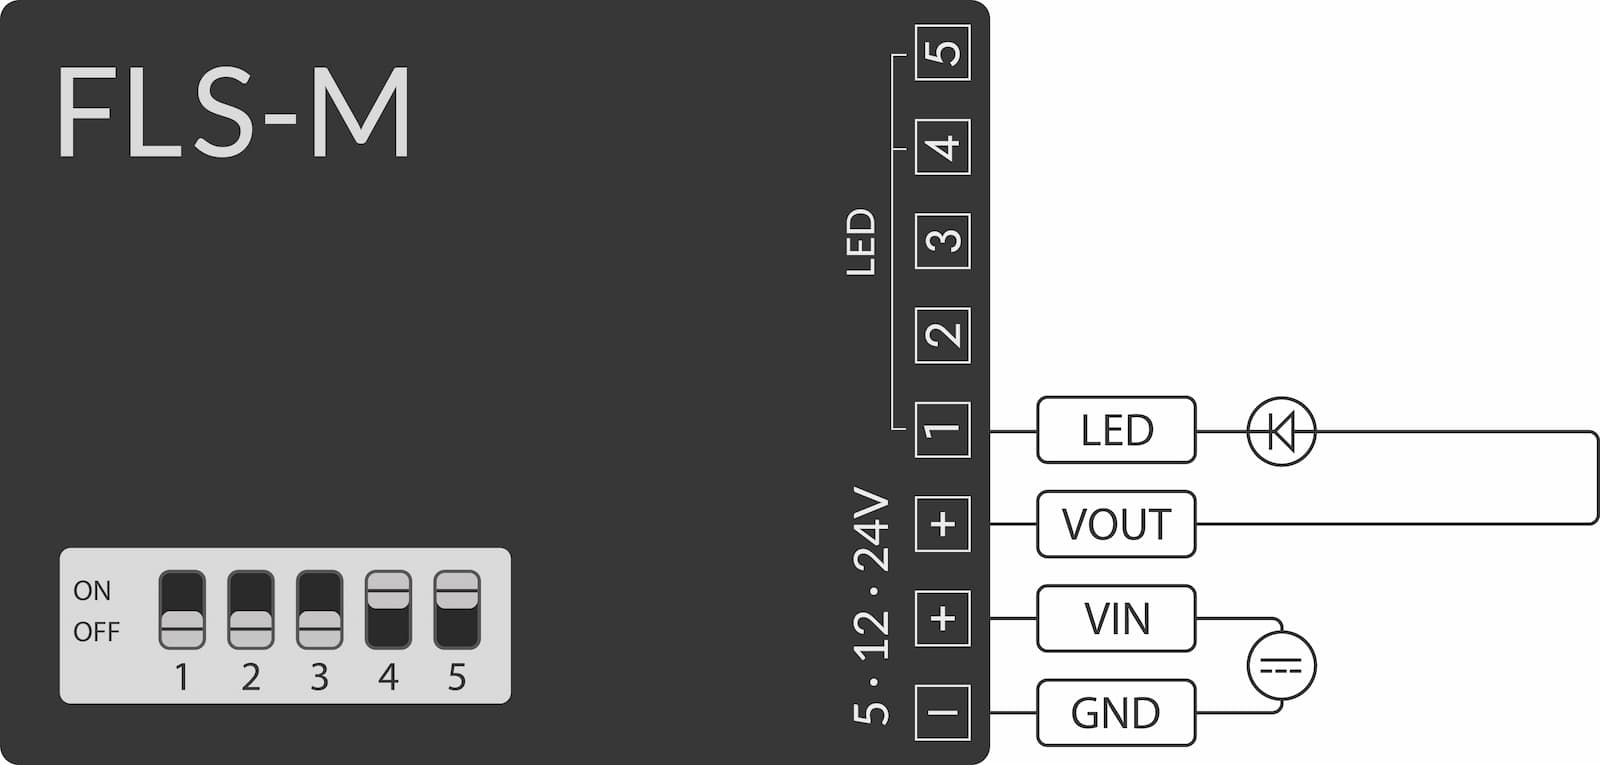
Connecting single-color LED strip
Uniform control
the cables for connection must meet the following technical conditions and be connected in accordance with this description
the LED strip can be connected to any channel of the FLS-M. The following circuit diagram shows a possible connection assignment. The following applies: GND = power supply unit ground, VIN = power supply unit operating voltage, VOUT = LED strip operating voltage
The FLS-M must be informed of the connected type of single-color LED strip by setting the DIP switch. The DIP switch is accessible on the top of the housing. A small screwdriver can be used to set the switch
the FLS-M registers in the Matter App as one luminaire
If several monochrome LED strips are connected, they all light up identically.
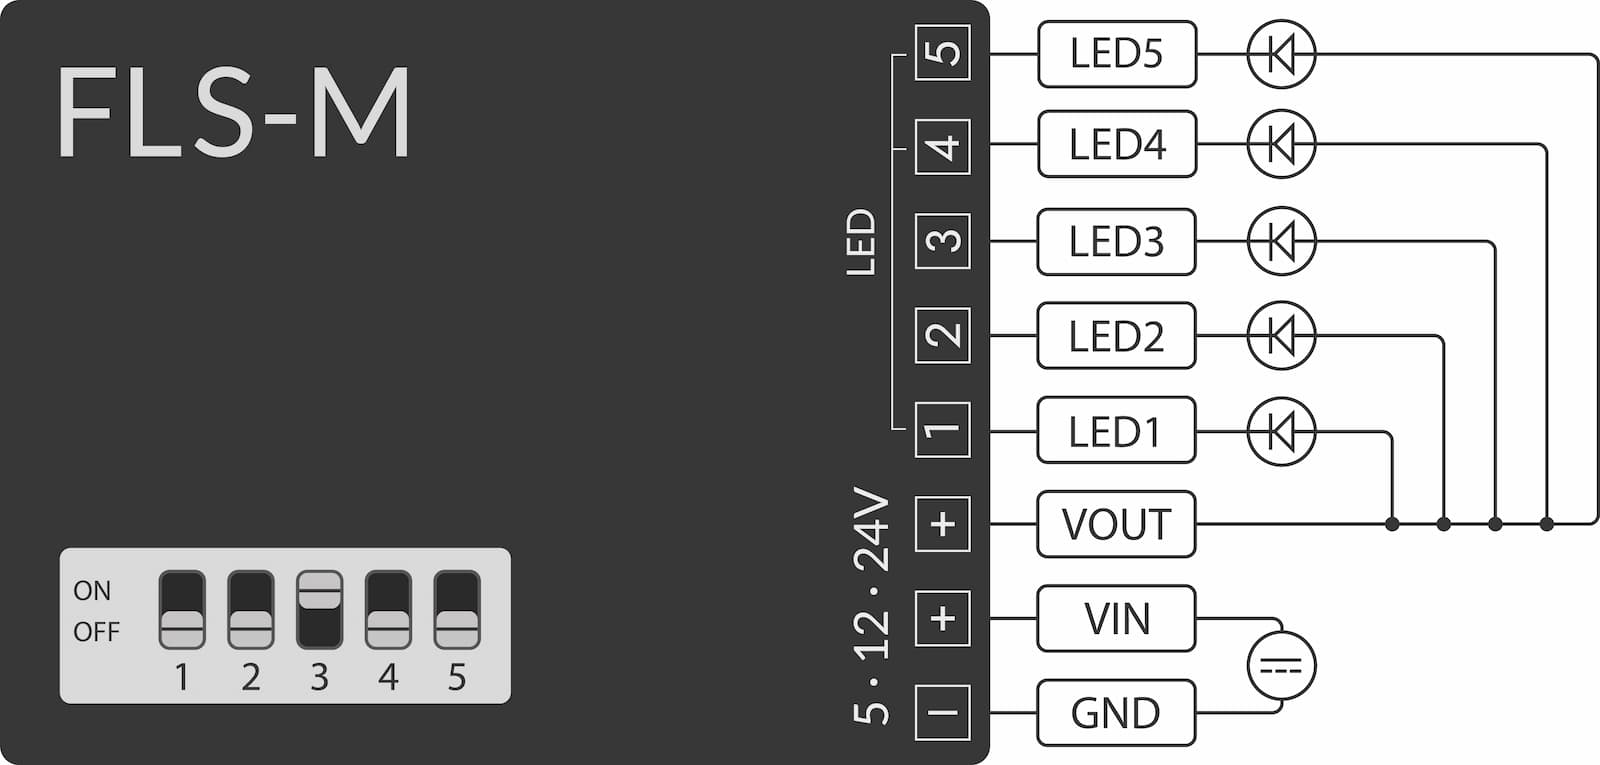
Different control
the cables for connection must meet the following technical conditions and be connected according to this description
the LED strip can be connected to any channel of the FLS-M. The following circuit diagram shows a possible connection assignment. The following applies: GND = power supply unit ground, VIN = power supply unit operating voltage, VOUT = LED strip operating voltage
The FLS-M must be informed of the connected type of single-color LED strip by setting the DIP switch. The DIP switch is accessible on the top of the housing. A small screwdriver can be used to set the switch
the FLS-M registers in the Matter App with five luminaires
Each monochrome LED strip can be controlled individually
Connecting individually addressable LED strips
the cables for connection must meet the following technical conditions and be connected in accordance with this description
the data line of the LED strip must be connected to the control channel of the FLS-M. The following circuit diagram shows the connection assignment. The following applies: GND = power supply unit ground, VIN = power supply unit operating voltage, VOUT = LED strip operating voltage
if the strip has a backup signal line, this can either be left open or connected to the control channel together with the data line
the FLS-M must be informed of the connected type of individually addressable LED strip by setting the DIP switch. The DIP switch is accessible on the top of the housing. A small screwdriver can be used to set the switch
the FLS-M registers in the Matter App as one luminaire
the connected individually addressable LED strip behaves like a classic LED strip
This configuration supports up to 1024 individually addressable LEDs of the type WS2811, WS2812, WS2812B, WS2813 and WS2815. Settings deviating from this must be created using the Config-Builder.
Currently, only static control of individually addressable LEDs is possible. No effects are supported yet.
Lighting sections
If more than one individual light is to be created, this must be set on a customer-specific basis. A maximum of 10 lights can be created per FLS-M. These can then be distributed across different lighting sections.
Each light created is also registered in the Matter App as one independent light.
Set Customized configuration mode on the DIP switch
DIP Config Open the Config-Builder and make settings
Load the file and restart FLS-M
Connecting the power supply
Connect the power supply unit with ground to GND and operating voltage VIN.
- the cables for connection must meet the following technical conditions and be connected in accordance with this description
It must be ensured that the connected LED strip is suitable for the operating voltage of the power supply unit. Otherwise the LED strip may be destroyed.
- use power supply unit with 5 V DC output for LED strips for 5 V DC
- use a power supply unit with 12 V DC output for LED strips for 12 V DC
- use power supply unit with 24 V DC output for LED strips for 24 V DC
Construction site mode
The FLS-M can be controlled in principle with the LED strip and power supply connected, without the need to teach to the Matter Controller:
- Press the button once: LED strips on the FLS-M are switched on and off alternately
- Press the button twice: LED strips are dimmed up or down in several stages
Commissioning
Matter over WiFi
The power supply unit can now be switched on. After starting, the FLS-M lights up white in the factory setting. All connected color channels are 100% controlled.
- Scan the enclosed Matter installation QR code with your smartphone or tablet
- Depending on the Matter controller and operating system used, the corresponding Matter App opens (Google Home, Apple Homekit, Amazon Alexa, etc.)
- Teach the FLS-M according to the instructions
After programming, the FLS-M can be controlled.
After connecting the power supply, it may take up to 4 seconds before the FLS-M starts and the connected LEDs light up.
The FLS-M can be taught-in to several Matter controllers at the same
time and controlled in parallel. To do this, a so-called shared
key
must be created in the Matter App (Google Home, Apple Homekit,
Amazon Alexa, etc.)
Zigbee
The power supply can now be switched on. The FLS-M starts in factory settings. All connected color channels are set to 100%.
- put the Zigbee gateway into commissioning mode
- Example for gateways from Phoscon ConBee III, ConBee II and RaspBee II see documentation of the Phoscon App Desktop or Phoscon App Mobile
- Depending on the selected configuration of the LED strips, one or more lights appear in the Zigbee gateway app. These must be added to at least one group.
The FLS-M can now be controlled.
After connecting the power supply, it may take up to 4 seconds before the FLS-M starts and the connected LEDs light up.
Factory new reset
To reset the FLS-M to factory settings, the following methods can be used: by pressing the button on the top of the housing or by performing a power-on/off sequence.
Reset via Button
supply the FLS-M with power
press and hold the button on the top of the housing for at least 10 seconds and release
a red status LED on the top of the housing flashes to confirm this
When the flashing has stopped, the FLS-M is back in the factory settings.
All login data on the FLS-M will be deleted.
Reset via power-on sequence
The following steps must be performed:
supply the FLS-M with power
Switch the power supply off and on five times in quick succession. If the switch-on cycle lasts longer than 3 seconds, the process will be aborted. Please note that high-power AC/DC power supplies often require more time for the DC voltage to completely drop when switched off, allowing the FLS-M to correctly detect the off state.

- a red status LED on the top of the housing flashes to confirm this
When the flashing has stopped, the FLS-M is back in the factory settings.
All login data on the FLS-M will be deleted.
Status LED
The status LED on the edge of the housing, next to the USB-C socket, shows the current operating status. Possible flashing codes repeat continuously after a short pause.
Valid operating states
| Blink code | Status | Comment |
|---|---|---|
| Continuous flashing | Ready for commissioning | Single-Admin (one Matter controller) |
| 1x long, 2x short | Ready for commissioning | Multi-Admin (two or more Matter controllers) |
| Off | Proper operation | with active connected operating voltage |
Faulty operating states
| Blink code | Status | Action |
|---|---|---|
| 4x short | Invalid configuration loaded | Create and upload a functioning configuration in the Config-Builder. |
| 3x short | Not part of a Matter network and not in commissioning mode (after 10 min) | Restart FLS-M and teach again. |
| 2x short | No WiFi signal | WiFi router power off? WiFi signal too weak? Reposition the router or FLS-M. Use a WiFi repeater. |
Firmware Update
The FLS-M firmware can be updated in various ways.
- Update via USB-C: possible from version v1.0.0 [currently recommended]
- Update via Zigbee: only possible from version v1.1.0
- Update via Matter: only possible for future versions
Firmware History
| Version | Status | Features |
|---|---|---|
| v1.0.0 | Release | Matter over WiFi Certified, Zigbee 3.0 Support |
| v1.1.0 | Beta | DimViaCurve, OpacityCurve, Animations, Zigbee 3.0 OTAU |
Update via USB interface directly in the web browser
Open the Online Firmware Updater

Connect the FLS-M to your PC/laptop via USB-C
Perform the update
Once the update process is complete, disconnect the USB-C cable from the FLS-M
Connect the FLS-M to the power supply or turn on the power supply
Done!
Update via USB interface
Alternatively, the firmware update can also be performed manually via USB.
Download The firmware file here
Download the latest version of GCFFlasher: GCFFlasher V4.08.00 for Windows
Disconnect the FLS-M from the external power supply or turn off the power supply
Connect the FLS-M to your PC/laptop via USB-C
Open GCFFLasher via terminal. A COM port number must be displayed in the
Path
column and the valueEspressif
must be displayed in theType
column.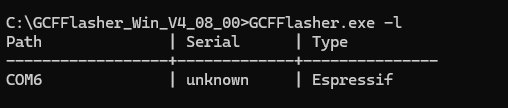
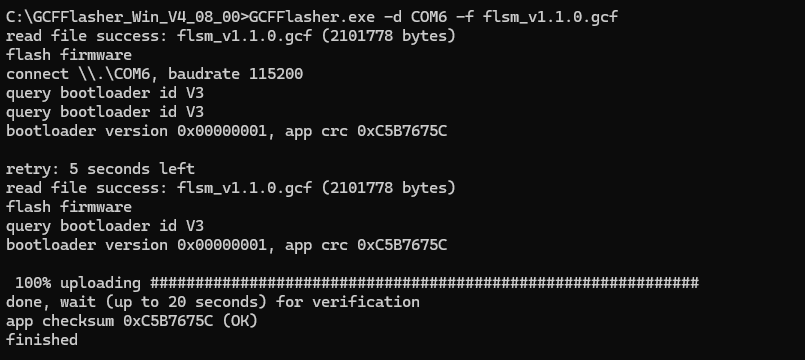
Enter the prompt for the example with COM port 6:
GCFFlasher.exe -d COM6 -f flsm_v1.1.0.gcf
Once the update process is complete, disconnect the USB-C cable from the FLS-M
Connect the FLS-M to the power supply or turn on the power supply
Done!
Update via Zigbee
The update process via Zigbee requires a Phoscon Gateway such as the ConBee II, ConBee III or RaspBee II.
Alternatively, the Home Assistant can be used with deCONZ Integration or ZHA Extension and a Zigbee-enabled USB dongle.
The process via Zigbee OTAU is generally described in the following FAQ entry.
Update via Matter
The update process via Matter will be available in the future.